This function is for paid plans (Premium).
Please purchase a plan when using this service.
Please read before use
System requirements
Please make sure to check the system requirements before installing Mac Login.
PC registration
Please register PCs by CSV referring to the introduction manual.
This installation procedure assumes that you have already registered your PC.
Administrator authority
Installation requires Mac administrator privileges.
YubiKey settings
Mac login uses YubiKey's challenge response feature for two-factor authentication.
Please be sure to configure YubiKey's Challenge Response settings before use.
Network conditions during installation
Be sure to connect to the network before installation.
If you are not connected to the network, you will not be able to install the software successfully.
Use of anti-virus software
Use of anti-virus security software, etc. may interfere with the login operation of this software.
Please refer to the Exclusion setting of antivirus software for Mac login to set up the exclusion.
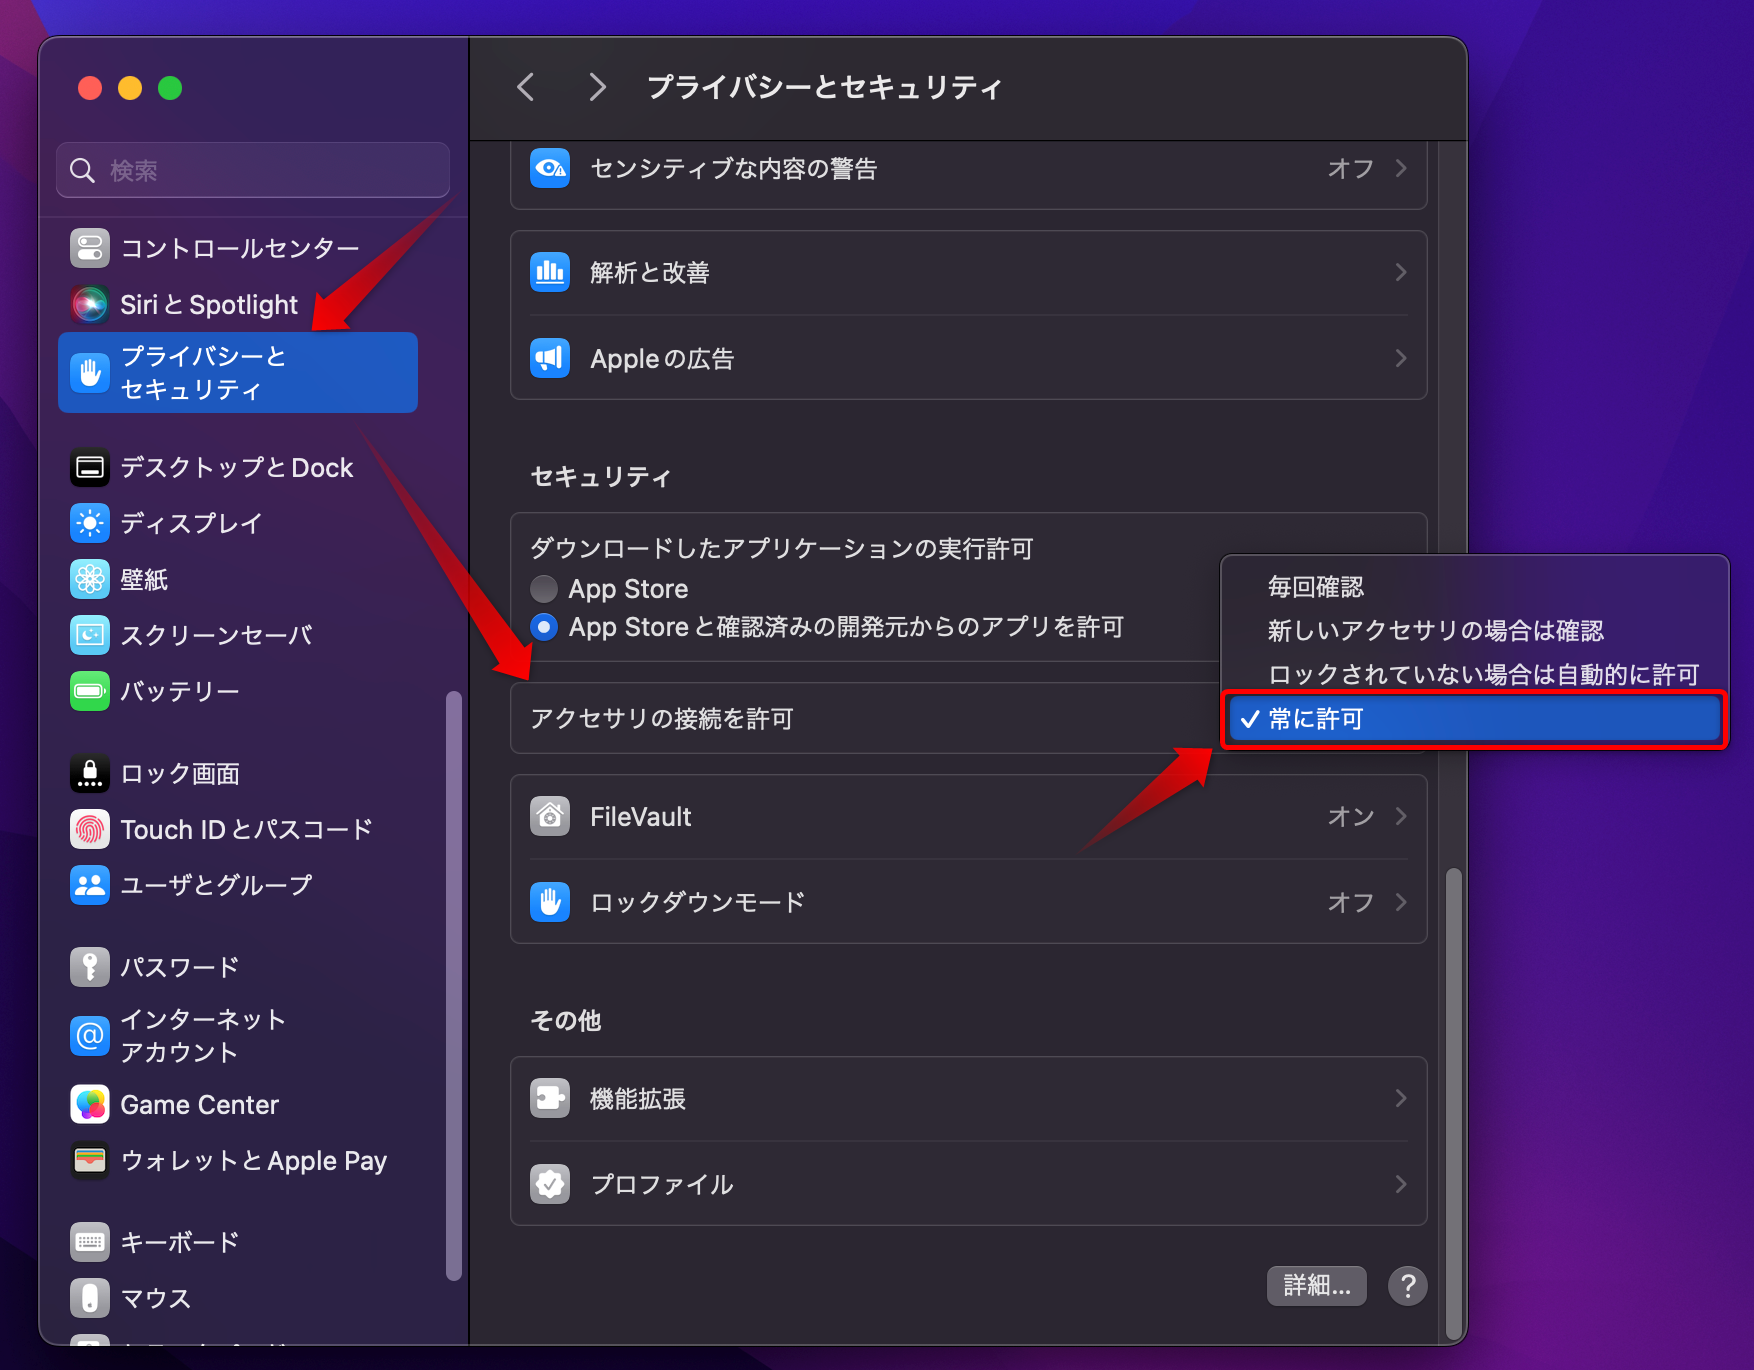
For users of Mac laptops with Apple Silicon
Mac laptops with Apple Silicon will ask for permission when connecting new accessories.
YubiKey will also ask for permission to connect, so please follow the instructions below to allow the connection.
Got to Apple menu > System Settings > Privacy & Security.
Scroll down and click on the menu next to "Allow accessory to connect" and click on "Always".
[Administrator or General User Operation]
Launch the client tool and perform setup.
After the setup is completed, the next time you log in, you will be able to log in using your YubiKey.
[Administrator operation]
From the Service Settings screen of the Management Console, configure a group policy for device control and apply the rules.
Pre-Installation settings
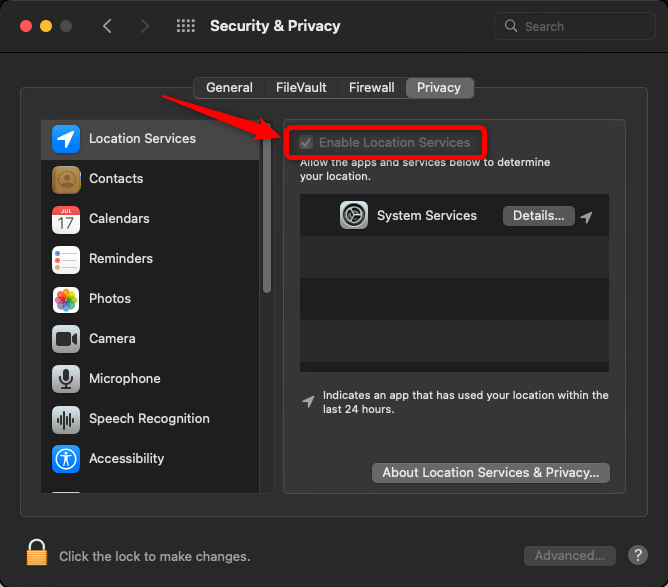
Mac Login Service has the ability to log location information.
To enable this feature, please make sure that the following location services are enabled.
1. System Settings > Privacy and Security > Privacy > Location Services
Make sure “Location Services” toggle button is turned on.
If “Location Services” toggle button is turned on, please proceed to the installation procedure.
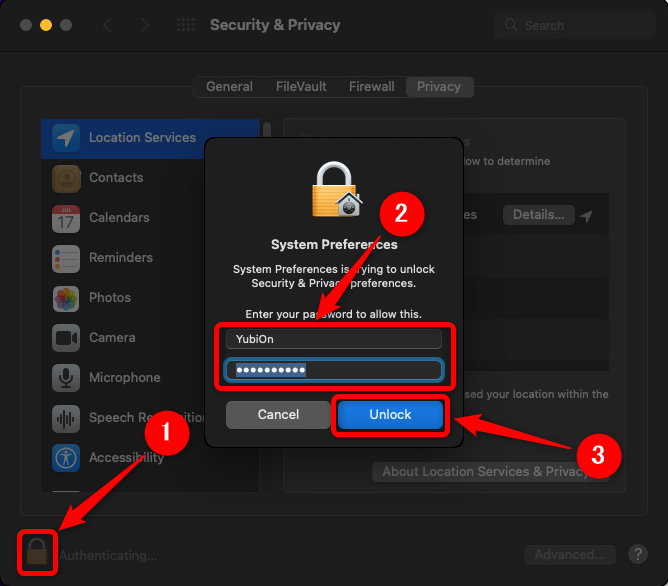
If “Location Services” toggle button is turned off, please do the following
2. Click the toggle button for “Location Services”.
If a privacy and security prompt appears, enter your “Username” and “Password”.
Then click the “Modify Settings” button.
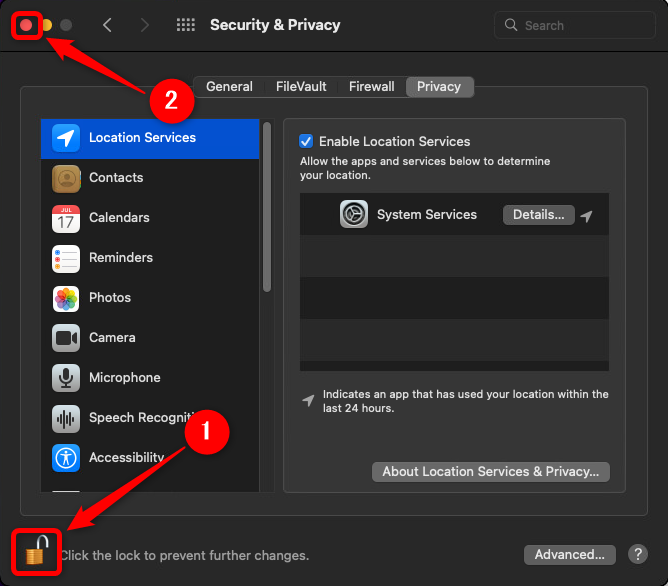
3. Click on the “key” icon, then click on the “Close” button in the upper left corner.
This is all that is required before installation.
Install
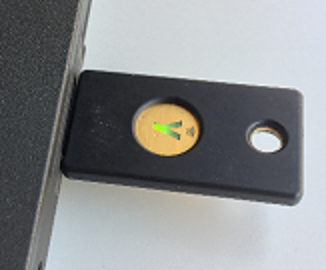
Insert the YubiKey into the USB port. Be sure to insert YubiKey because it is included to detect and work with YubiKey at the completion of installation.
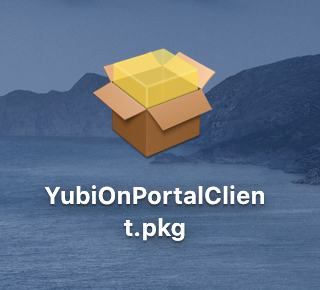
Run the downloaded installer.
If the message “YubiOnPortalClient.pkg” is an application downloaded from the Internet. Are you sure you want to open it?” is displayed, click “Open”.
If it does not open, click “YubiOnPortalClient.pkg” while holding down the Control button and click “Open”.
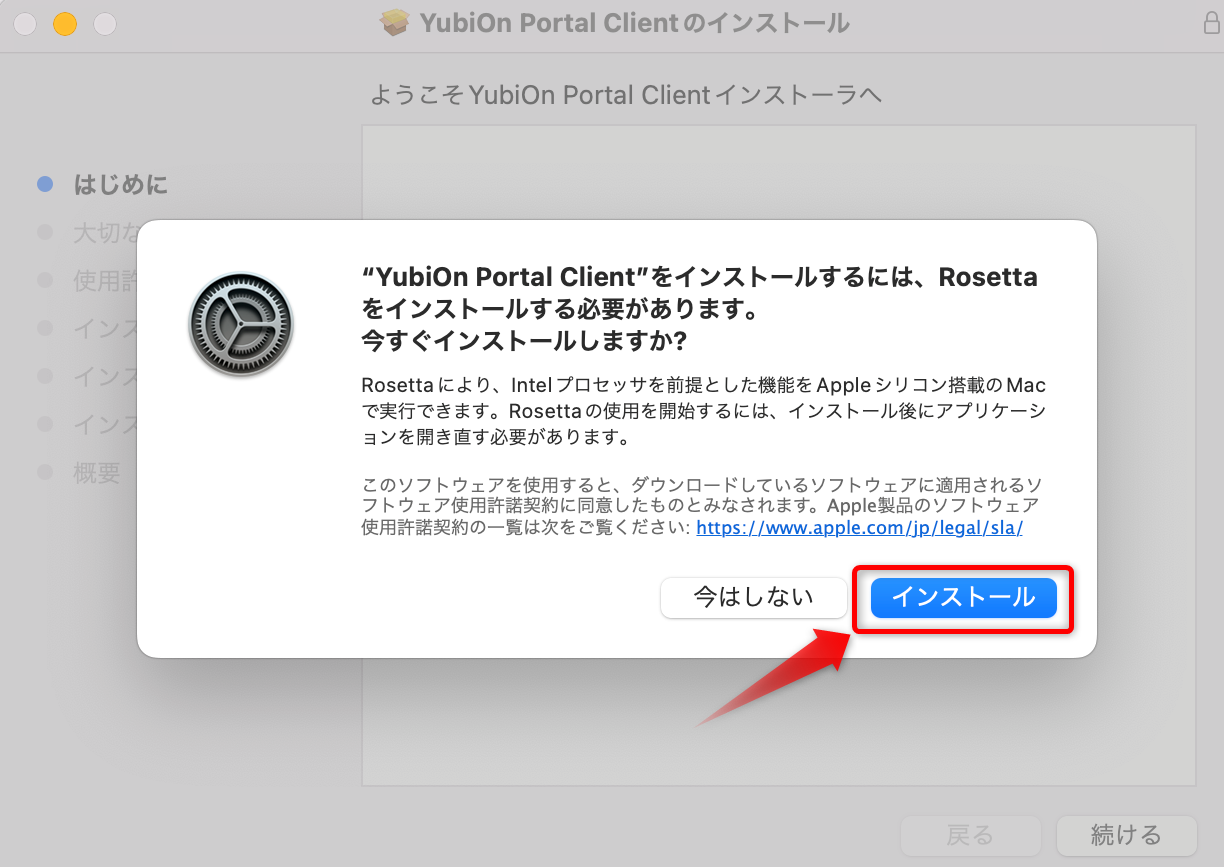
For Mac users with Apple Silicon
When the installer runs, click “Install” when asked to install Rosetta.
*If your software version is 1.2.5 or later, Rosetta installation is not required, so this message will not appear.
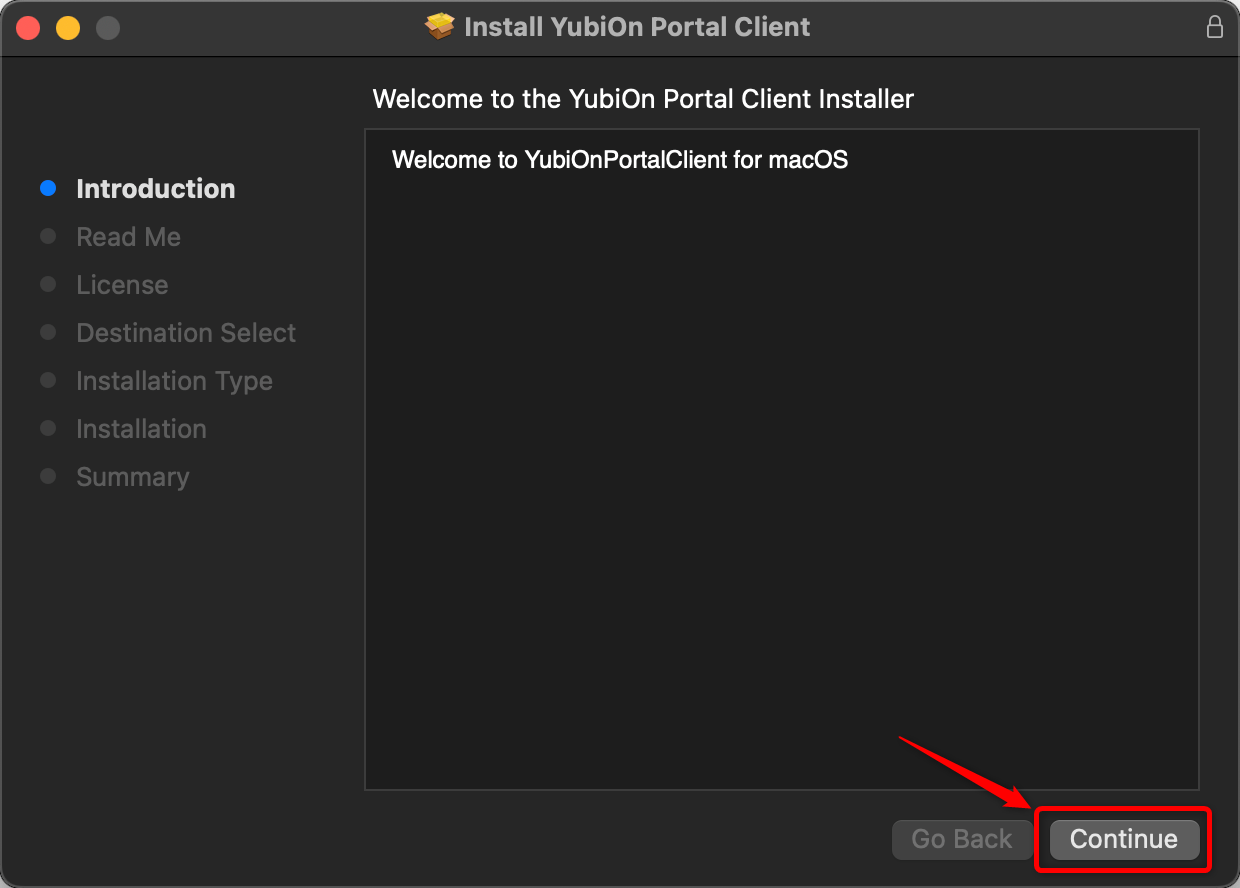
Click “Continue.”
Read “Important Information” and click “Continue.”
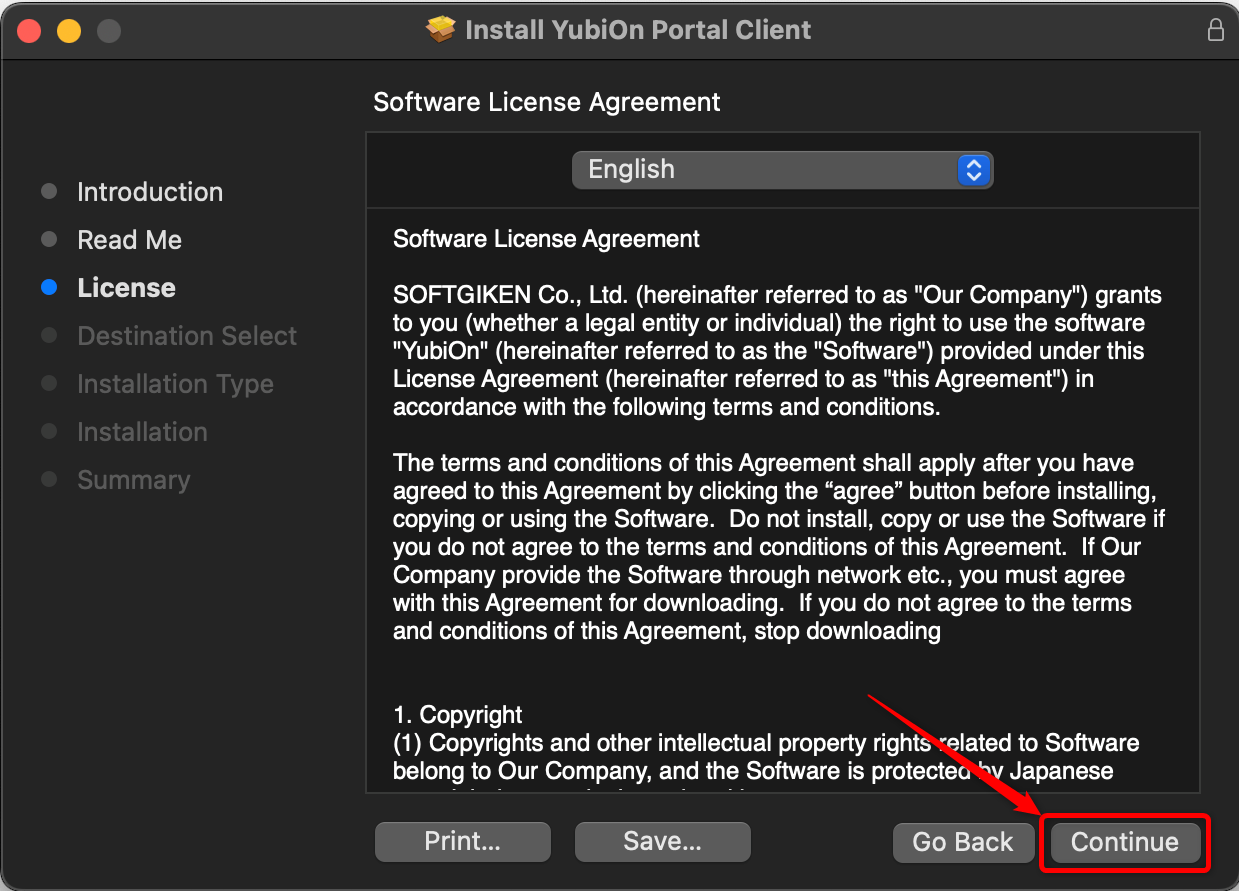
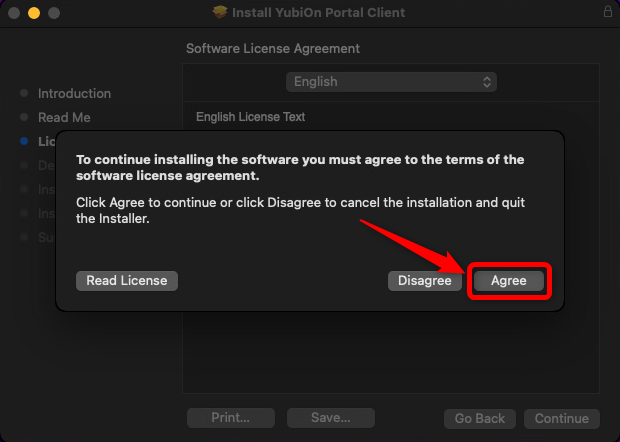
Read the “Software License Agreement” and click “Continue”.
Click “Agree.”
Click “Continue.”
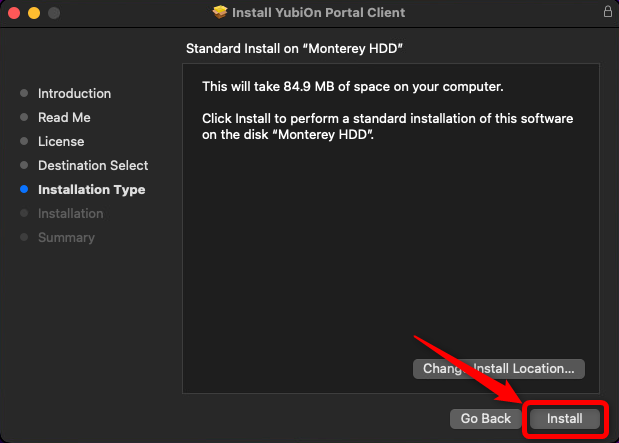
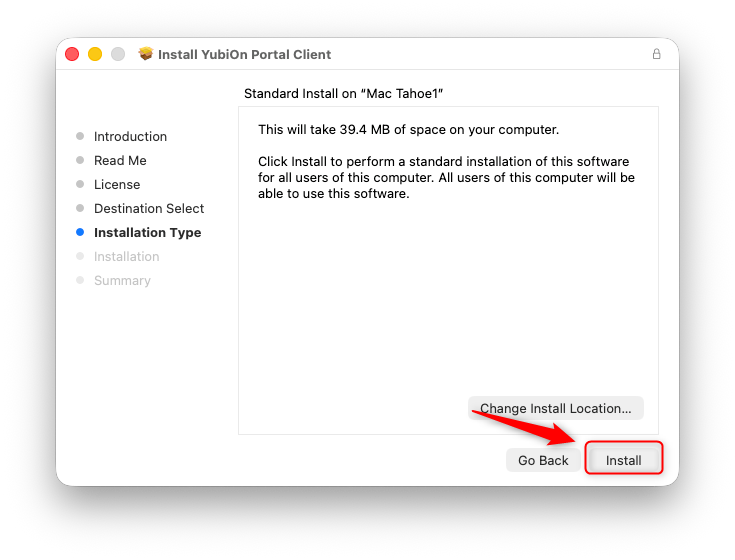
Click “Install”
Administrative privileges on the macOS device are required.
Enter your “User Name” and “Password” and click “Install Software”.
If the installer asks for computer management permissions, click “Allow.”
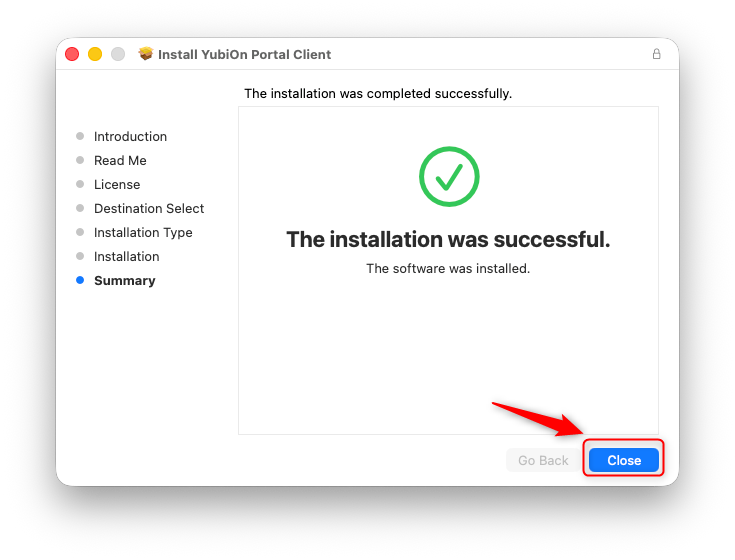
After the installation is complete, several pop-ups will appear in addition to the installation complete screen.
Click “Close.”
If the message “Do you want to put the “YubiOn Portal Client” installer in the Trash?” If the message “Do you want to put the installer of “YubiOn Portal Client” in the Trash?
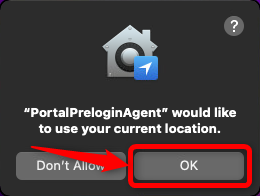
Location and Notification settings
Click “OK” when a pop-up window appears to allow the use of location information.
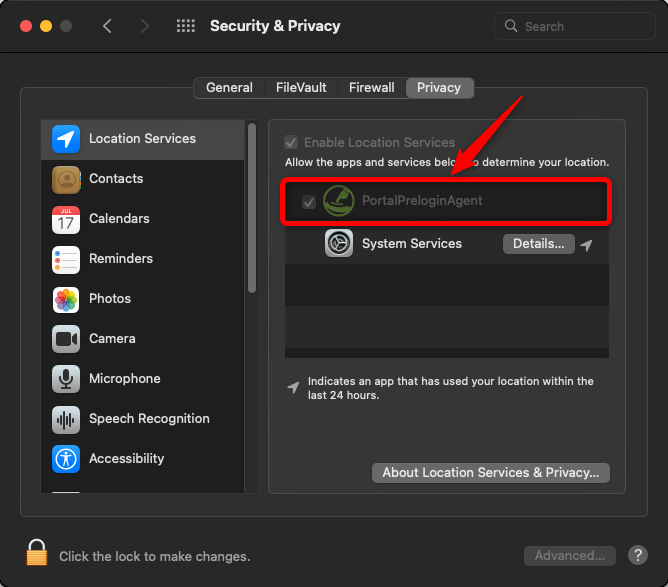
If the OS is Ventura
Please set up after rebooting as it will be displayed after rebooting.
Open System Settings > Privacy and Security > Privacy > Location Services.
If the toggle button for “PortalPreloginAgent” is turned on, the configuration is complete.
If you do not see the above pop-up, such as during reinstallation, turn on “PortalPreloginAgent” after reboot.
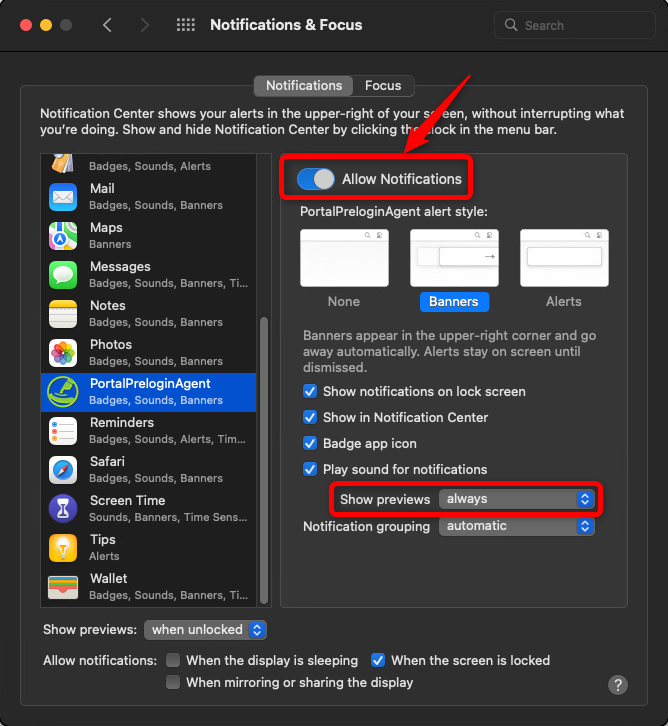
Click “Allow” when the notification permission pop-up appears.
If the OS is Ventura
Please set up after rebooting as it will be displayed after rebooting.
Open System Settings > Notifications > PortalPreloginAgent and if it is set as follows, you are done.
Allow notification” is enabled.
“Show previews” is set to “Always”.
If you do not see the above pop-up, for example when reinstalling, please go to System Settings > Notifications and configure your settings.
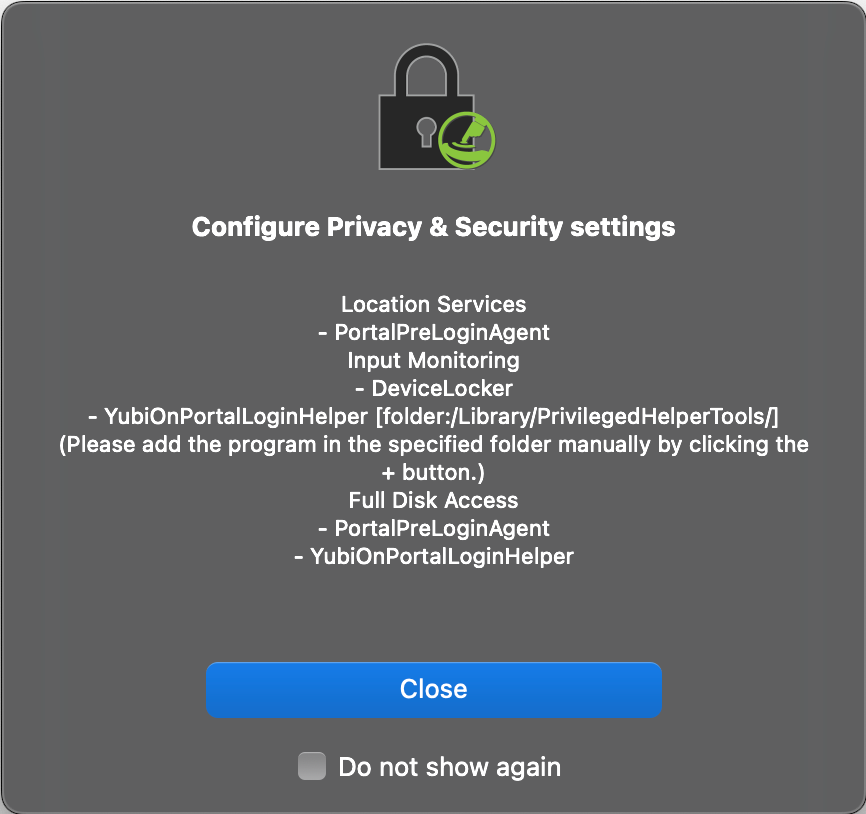
Privacy and Security settings
Privacy and Security settings are required for each operating system to use the Mac login service.
Please see below for information on Privacy and Security settings.
Privacy and Security setting items
The following settings are required for Privacy and Security
Input monitoring
Added “DeviceLocker” and “YubiOnPortalLoginHelper.
Full disk access
Added “PortalPreloginAgent” and “YubiOnPortalLoginHelper”.
A confirmation pop-up for the keystroke will appear.
Receiving keystrokes
The “Receive Keystrokes” pop-up may not appear.
If it does not appear, open the System Settings screen and continue with the settings.
If it does not appear, open the System Settings screen and continue with the settings.
“DeviceLocker” will be added to the input monitoring.
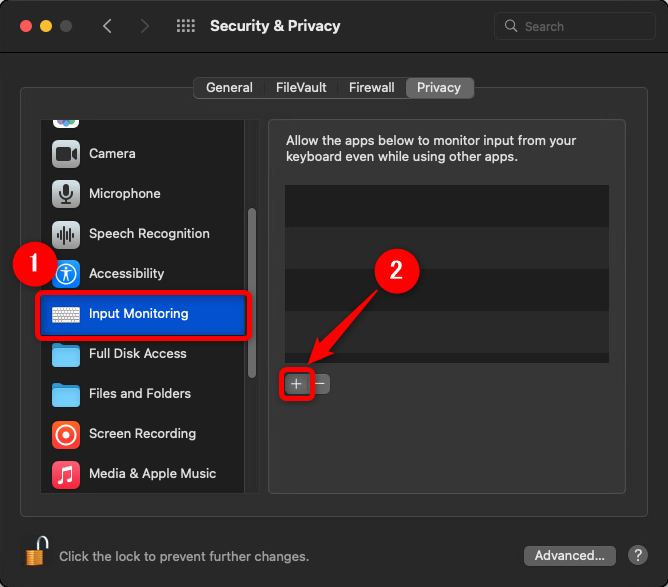
If you do not see the above pop-up, such as during reinstallation, go to System Settings > Privacy and Security > Input Monitoring.
Input monitoring settings
Click on “Input Monitoring,” then click on “+.”
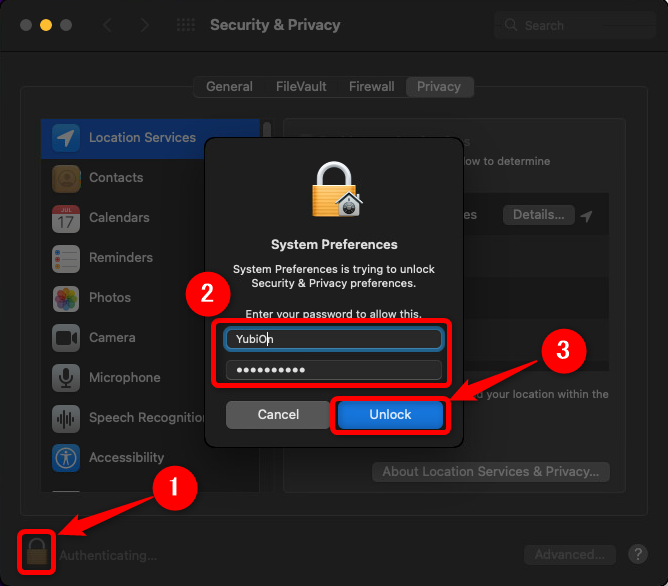
Administrator privileges are required, so enter your “username” and “password,” then click “Unlock”.
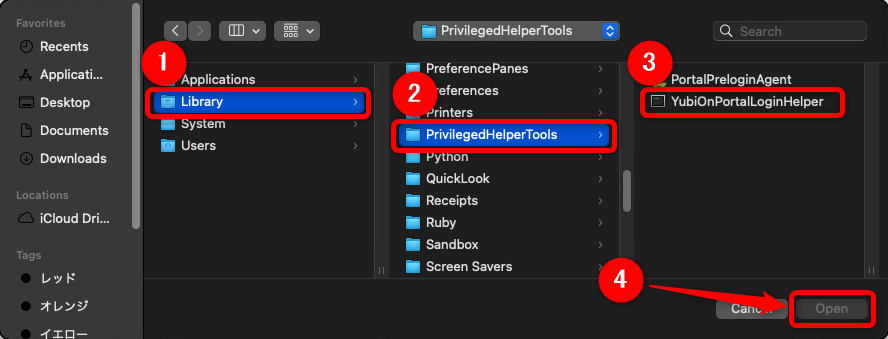
Select “Macintosh HD.”
Click on Library > PrivilegedHelperTools > YubiOnPortalLoginHelper and click “Open”.
If you are using macOS Tahoe version 26.1 or 26.2, we have confirmed an issue where the added “YubiOnPortalLoginHelper” does not appear in the list, despite the configuration itself completing successfully, due to a macOS bug.
This is a display-only issue. If you follow the steps to add “YubiOnPortalLoginHelper” and perform the additional operations as instructed, the application will function correctly.
Please note that this issue does not occur in versions 26.0, 26.0.1, or 26.3 and later.
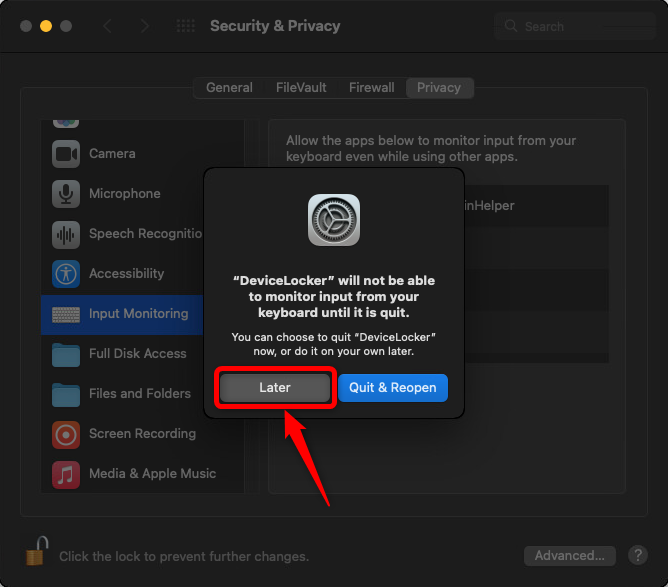
Turn on the “DeviceLocker” toggle button.
If “DeviceLocker” is not listed, click the “+” button and add “DeviceLocker” from “Applications”.
When a confirmation message is displayed, click “Later.”
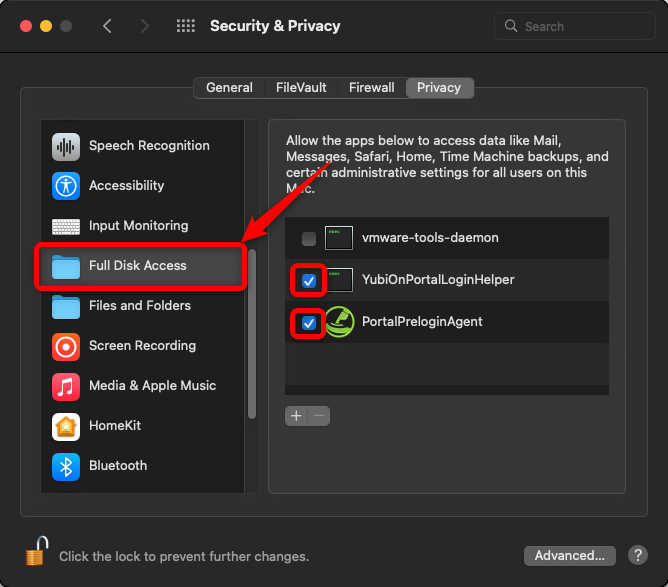
Full disk access settings
Click on “Full Disk Access.”
Turn on the “YubiOnPortalLoginHelper” toggle button.
Turn on the “PortalPreloginAgent” toggle button.
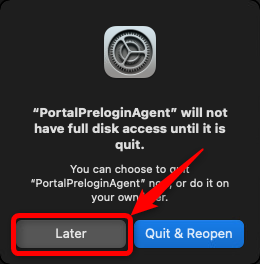
When a confirmation message appears, click “Later.”
If “YubiOnPortalLoginHelper” and “PortalPreloginAgent” are not in the table, click the “+” button and add them from the following location.
Select “Macintosh HD
Click on Library > PrivilegedHelperTools > YubiOnPortalLoginHelper and click “Open”.
If you are using macOS Tahoe version 26.1 or 26.2, we have confirmed an issue where the added “YubiOnPortalLoginHelper” does not appear in the list, despite the configuration itself completing successfully, due to a macOS bug.
This is a display-only issue. If you follow the steps to add “YubiOnPortalLoginHelper” and perform the additional operations as instructed, the application will function correctly.
Please note that this issue does not occur in versions 26.0, 26.0.1, or 26.3 and later.
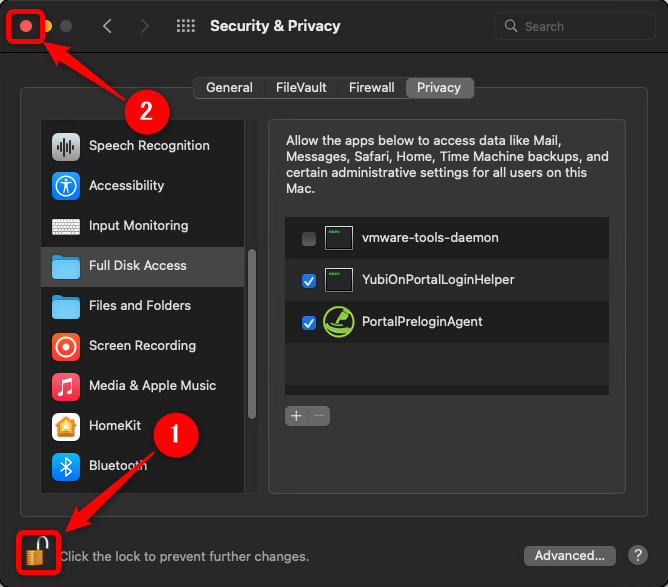
After setting the above, check the “Do not show again” checkbox and click the “Close” button.
Reflection of settings
Click on the “Close” button in the upper left corner.
Restart the terminal.
The settings will not be reflected unless the system is rebooted.Be sure to reboot.
When rebooting, it works fine even if YubiKey is plugged into the device.
After rebooting, please log in to the terminal.
*Setting is not complete at this stage. To set up login using YubiKey, you need to configure the client tool.
If the OS is Ventura
Permission to use location information and notification will be granted after restart.
Please allow the following various pop-ups and change the settings.
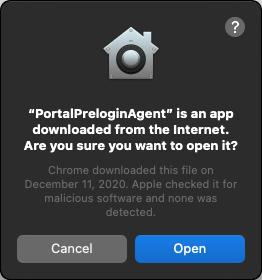
Permission to launch “PortalPreloginAgent” application
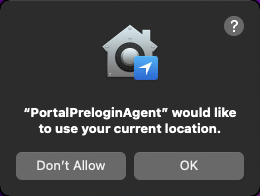
Permission to use location information
If this pop-up does not allow you to do so, please check your location notification settings and set your permission settings.
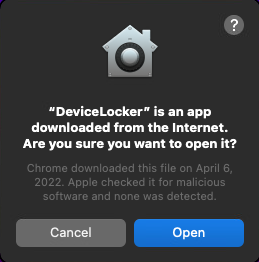
Permission to launch “DeviceLocker” application
Allow notification
A notification notice appears in the upper right corner of the screen.
Please check your your location notification settings and allow notifications from the system settings.
That’s it for the Mac login installation.
To enable two-factor authentication for a device, you will need to operate the configuration tool.